An easy-to-understand tutorial on how to use poses in sims 4. I’ll teach you how to use in-game poses, CAS poses, and gallery poses!
This post may contain affiliate links, which means I’ll receive a commission if you purchase through my link, at no extra cost to you. Please read full disclosure here.
How to Use Poses in Sims 4
Sims 4 poses are such a FUN way to get amazing screenshots of your sims.
However, if you’ve never used them before they can be somewhat confusing.
I know that I personally had to watch tons of Youtube videos and read lots of guides to fully understand what I was doing.
But for your convenience, I’ve put together a quick & easy sims 4 pose tutorial with EVERYTHING I’ve learned so you won’t have to waste hours figuring it out like I did!
In this guide, I’m assuming that you already know how to download sims 4 pose mods into your game. But if you don’t, click here for a video tutorial.
And if you’re looking for the best sims 4 list of poses, you can find that HERE!
To jump to a specific pose mod tutorial, click on the links below:
Today I’m going to show you how to use poses in sims 4. Let’s get started!
How to Use Sims 4 In-Game Poses using Pose Player
In-game poses are the most complicated out of all sims 4 poses to use. They require multiple steps and mods to work correctly.
So before we go any further, make sure you’ve downloaded these two mods: Teleport Any Sim Mod & Pose Player Mod.
The Teleport Sim Mod will allow you to easily place your sims wherever you need to for the poses and all together for group poses.
The Pose Player Mod creates a new menu in your game. This is where all your in-game poses will be listed. Once you click on one of the poses, then that will be added to your sim’s queue to do that pose until the action is canceled.
I also REALLY recommend downloading a sims 4 ReShade preset. This makes the color and graphics of your game look INCREDIBLE; therefore making your screenshots look even better and requiring less photo editing.
I have an entire list of the 21+ Best Sims 4 ReShade Presets for Mind-Blowing Graphics to give you plenty of options to choose from!
Now that we have that stuff out of the way, we can finally start using poses.
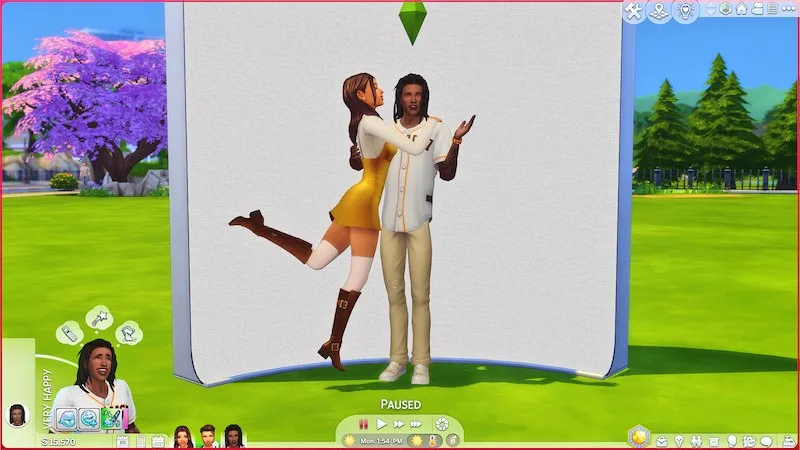
So, not only am I going to show you how to use in-game poses, but I’m going to show you how to get sims to pose together in sims 4 by using the Random Couple Poses pack by whatasimmer.
(For even more adorable sims 4 couple poses, click HERE!)
First, I like to place one of the backdrops that came with The Sims 4 Moschino Stuff. I do this because I’m typically cutting the background out of all my photos using Canva. And it’s easiest if the background is all one color.
While still in buy mode, I’ll search for ‘teleport‘ and find the teleporter mod. It looks like a Knight.
Since the pose we’re using requires two sims, you’ll want to place two of the teleporters in the exact SAME spot right on top of each other!
Then you’ll click on the teleporters to teleport each sim to that spot. You’ll end up with two sims inside of each other, which may look a little funny, but trust the process. 😌
Have the first sim you want to pose playable, and click on them. Find and click on ‘Pose by Pack.’
Then scroll to ‘Random Couple Poses‘ and click on the pose you want them to do & choose the correct position.
Usually, there will be an indicator of which position is the right one for the sim. For example, in this pose pack, it will say either ‘Pose 3: Female‘ or ‘Pose 3: Male‘
Once you’ve clicked on the right pose, exit out of the menus.
And repeat the same process for the other sim.
Now press play and your sims should be doing the custom pose!🎉
The sims will continue to do the pose until you cancel it out of their queue.
After you cancel out the action of the pose, the teleporters will disappear. You’ll need to replace them to have your sims do the same or a different pose.
To take the best screenshots, you’ll want to hit TAB to get rid of the sims 4 UI and be able to move your camera around freely.
That is the exact process you’ll use for nearly all in-game sims 4 pose mods!
However, there are a few exceptions. Some poses will want the teleporters in specific places, use furniture, or require extra custom content objects.
To use custom objects with poses:
- First, download the required cc and place it in your mods folder.
- Then place it on your sim in CAS (usually found in hats or accessories category) before you have them do the pose.
- Follow the normal in-game pose process.
- Finally, go back into CAS, and take the item off when they’re done.
The majority of the time, the creators of the pose pack will have instructions on the download page of what cc you need or where to place your sims.
Like this description for the Family Pose Pack by 75sims:
Some other things you can do to make your sims 4 pose pictures even better is to add lighting all around the backdrop or try to create the perfect background that fits the pose.
I personally fix all of that later when I edit in Canva. It’s a SUPER EASY to use editing program where you can create sim edits and graphics to share on Tumblr, Pinterest, Youtube Thumbnails, etc.
For example, here’s a quick little Sims 4 Valentine’s Day card I put together in Canva using the photos I took making this pose tutorial.
I used the ‘cut out background’ button, edited the colors, added a drop shadow, changed the background color, & added text.
The image you see at the top of this post is also something that I created in Canva.
I know that was a lot to take in, but hopefully, it was easy to understand!
If you have ANY questions, leave me a comment and I will get back to you as soon as possible.
{RELATED POST: 31+ Adorable Sims 4 Family Poses For The Best Screenshots}
How to Use Sims 4 CAS Poses
In my opinion, create-a-sim poses are some of the easiest sims 4 poses to learn how to use.
They’re the first kind of poses that I ever played with, and the ones that I use the most to this day.
After you’ve downloaded the CAS pose you would like to use (you can find cute ones HERE!) and put it in your mods folder, you’ll start up your game and head into create-a-sim.
Then create a gorgeous sim of your own or pick one from the gallery that you want to get great screenshots of.
Now when you downloaded the CAS pose pack, it should’ve listed a trait animation that it replaced.
For example, in this CAS pose pack by Katverse, the poses replace the self-assured trait animations.
So, whenever you click on the self-assured trait in CAS, your sim will start posing.
The poses don’t work on a loop. You’ll need to re-click on the trait if you want your sim to do the poses again.
And that’s all there is to using sims 4 CAS poses!
But here are a few tips & things to keep in mind that may help you:
- zoom in & out and change the angle of your sim to get a variety of screenshots of the poses
- you can only have one pose pack for each trait animation replacement in your mods folder at a time, so do your best to keep track of what you have.
- use a CAS background that’s all one color to make it easier to cut your sim out of the background for photo edits.
- Easy-to-use editing programs, like Canva, are great for cutting out the background in one click, stitching screenshots together, editing colors, and making amazing graphics for social media.
I hope that this CAS poses tutorial was helpful and as usual, if you have any questions, comment below.
{RELATED POST: 31+ Must-Have Sims 4 CAS Poses You Can Download Free}
How to Use Sims 4 Gallery Poses
Gallery poses, like CAS poses, are pretty simple to learn and use once you understand the basics.
Custom gallery poses are a way to change the image that appears when you share your households to the sims 4 gallery.
So, instead of having the default poses you see all the time, you can download and use cute gallery pose mods to stand out on the gallery!
Here are the simple steps to using a custom gallery pose:
- Download the gallery pose to your mods folder
- Go into Create-a-Sim & create a household you want to share or save
- If you’re using a group pose, make sure your sims are in the correct order (the creator should list the order on the download page)
- Click the save household button in the top-right menu
- A screen will pop up with a photo of your sim/sims to share to the gallery. Your sims should already be in their custom poses, but if not, click randomize portrait (camera icon) to get the pose you desire!
- Then click on save to library or share to gallery.
- Your custom gallery pose will now appear as the image on the gallery!
(If you’re looking for a variety of gallery poses for all family and sim types, check out THIS list!)
I told you it was pretty simple!
In reality, the most complex thing about gallery poses is understanding the different categories of gallery poses & primary vs secondary poses.
So here are a few things you need to know about sims 4 gallery poses:
- Poses for the main household portrait are called primary poses
- Poses for a sim’s individual portrait are called secondary poses
- Only have one pose pack of each type for each category in your mods folder at a time. For more explanation, read THIS!
- Keep a folder on your desktop for your extra gallery poses, so you can easily switch them in and out of your mods folder.
- If you find yourself having to click on randomize portrait a trillion times to get the PERFECT custom gallery pose, the no mirroring mod helps with that!
And one last little tip, that may come in handy!
As I already mentioned, group gallery poses require that sims are created in a certain order.
If you happen to put them in the wrong order (like I do all the time🙄), save the household and then re-merge the household in, deleting sims to eventually get them in the right order.
It might be a hassle but it works!
I hope that this gallery poses tutorial was helpful and as usual, if you have any questions, comment below.
{RELATED POST: The Ultimate List of Sims 4 Gallery Poses (Family, Couple, Male, Pets, & More!)}
Hopefully, this post answered all of your questions about using sims 4 pose mods, whether that be in-game, CAS, or gallery!
And if not, feel free to leave me a comment on this post and I will respond as soon as possible.
This post was all about How to Use Poses in Sims 4.
Other Posts You May Like:


